
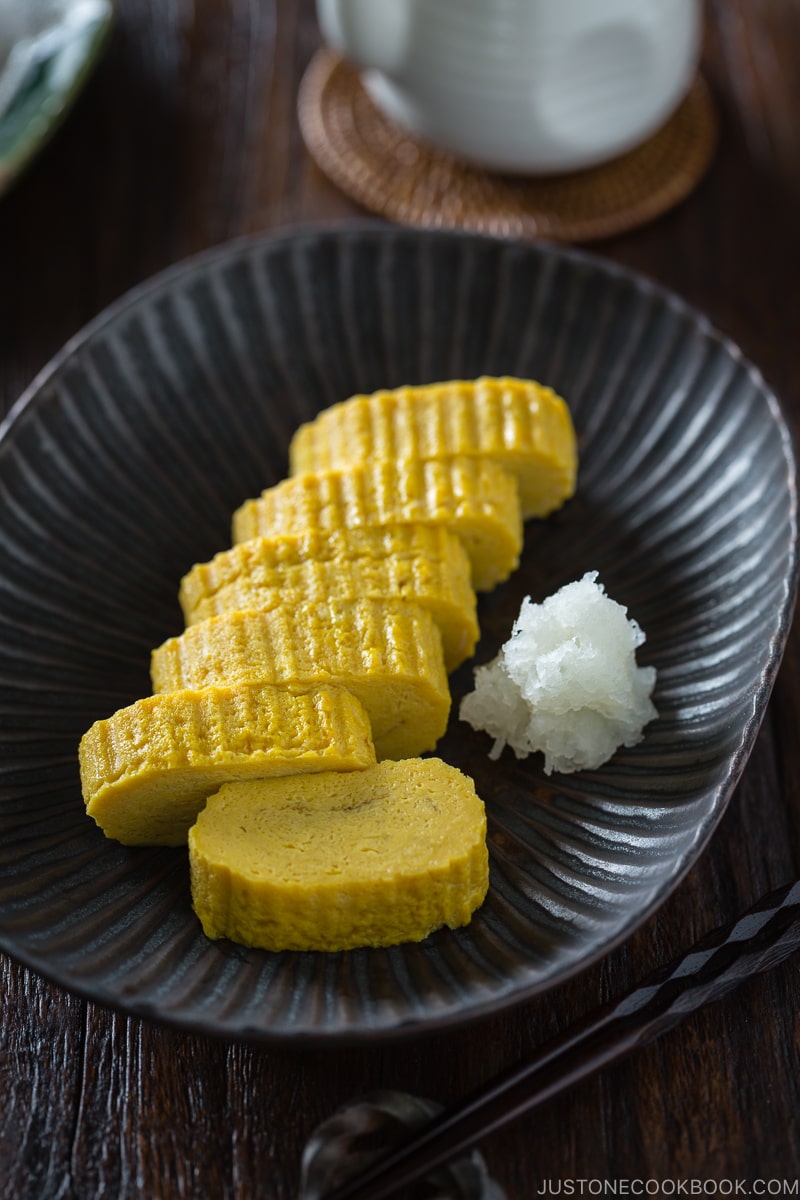
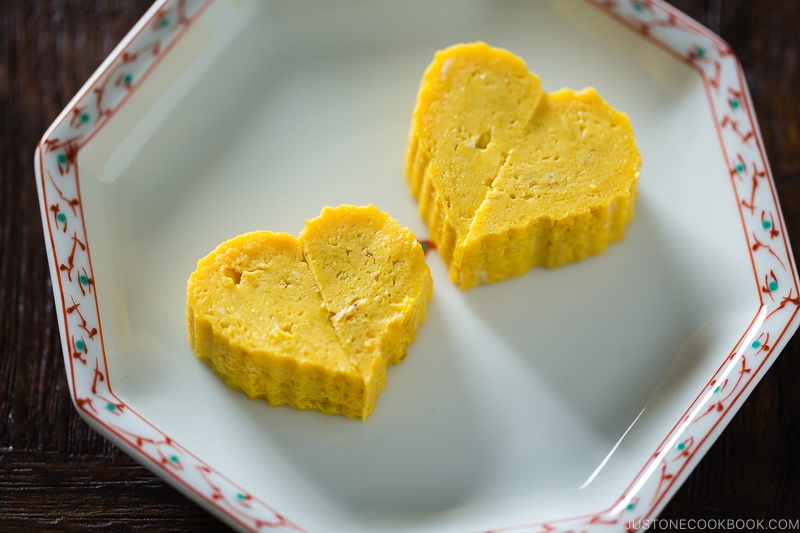
Tamagoyaki (卵焼き or 玉子焼き) is a sweetened Japanese omelette that resembles mini bars of golden pillows. With a slightly sweet taste and custardy texture, tamagoyaki is well-loved among Japanese children and adults. You’ve most likely tasted these rolled eggs in a Japanese breakfast as a source of protein, as a side dish in a bento (Japanese lunch box), or atop sushi.
Today, let’s learn how to make a dashi-forward tamagoyaki called Dashimaki Tamago (だし巻き玉子)! There are many types of tamagoyaki, and this advanced version is the most challenging to make since the egg mixture is quite watery. Don’t worry; I’ll guide you every step of the way with photos and detailed instructions.
What is Tamagoyaki?
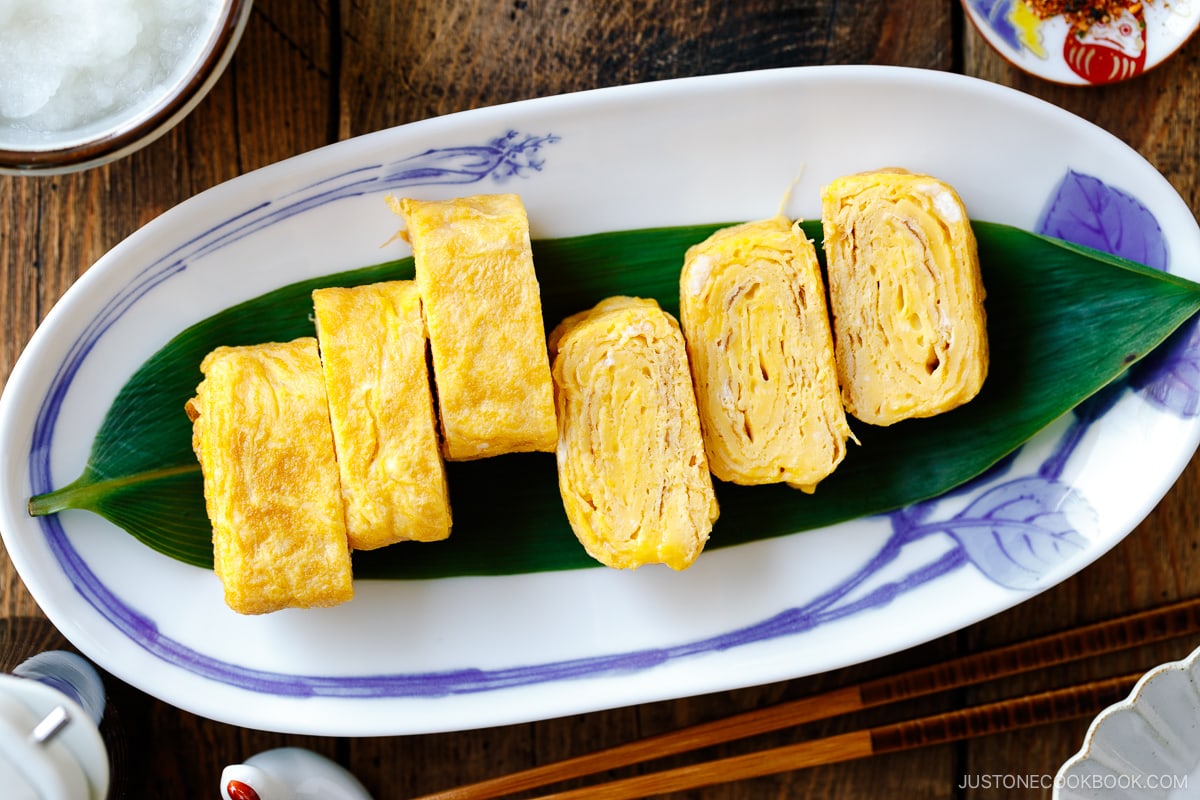
In Japanese, tamago means egg, and yaki means grill, so tamagoyaki translates to “grilled egg.” To make this classic dish, we roll up layers of thin egg crepe in a frying pan, wrap it into a log shape, and slice it into bite-sized pieces that you can pick up with chopsticks.
Unlike the typical Western omelette, Japanese tamagoyaki uses an egg mixture flavored with dashi, soy sauce, mirin, and sugar. This seasoning gives it a lightly sweet and savory taste.
Tamagoyaki Variations
Tamagoyaki (玉子焼き, 卵焼き) is a general umbrella term for various types of Japanese rolled omelettes. It can be dashimaki or atsuyaki depending on the region.

- Tamagoyaki (卵焼き) – This is the simplest form of a rolled omelette without extra sugar or dashi (Japanese soup stock). If you are new to making tamagoyaki, start practicing from this recipe.
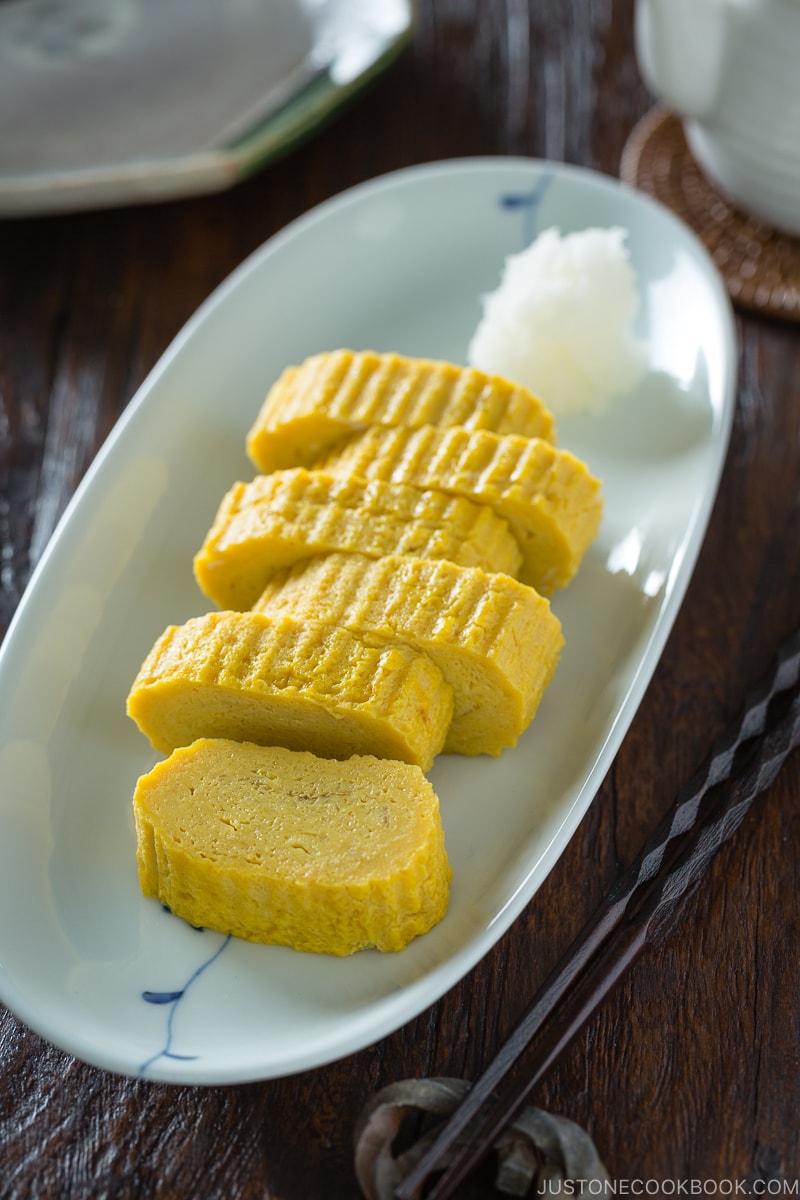
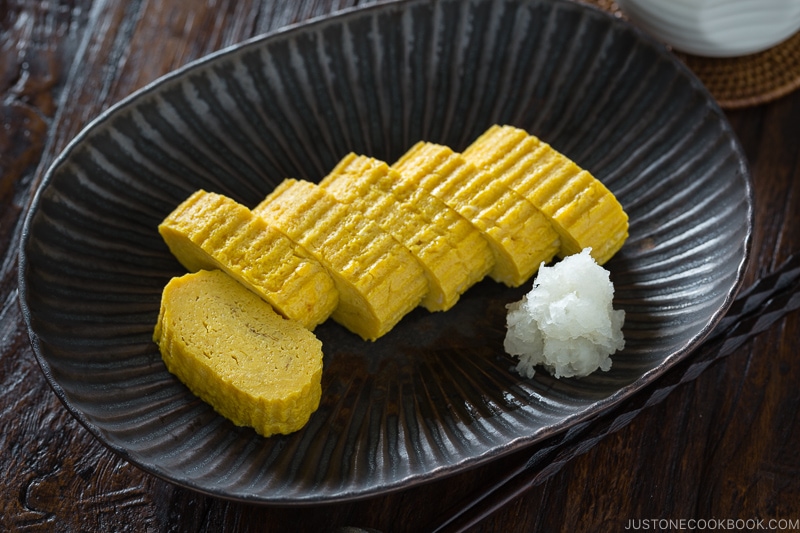
- Dashimaki tamago (出汁巻き玉子) – This is today’s recipe. Primarily enjoyed in the Kansai (Osaka) region, it has a dashi-forward, salty flavor from the large amount of dashi used. It’s very silky and tender and must be eaten immediately. It’s the most challenging to make of all the types since the egg mixture is very watery.
- Atsuyaki tamago (厚焼き玉子) – Known for its sweetness, it’s popular in the Kanto (Tokyo) region and northern regions. With less dashi, it’s much easier to roll, but it’s prone to burning from the higher sugar content. I make a golden sweet dashi called Kanro dashi (甘露だし) ahead of time so I can enjoy atsuyaki tamago often. If you are experienced making tamagoyaki, try my sweet rolled omelet recipe.
- Castella tamago (カステラ玉子) – Served as part of the Edomae-style menu at high-end sushi restaurants in the Kanto (Tokyo) region, this variation is reminiscent of Castella cake. It’s made in a similar method to datemaki. Shrimp paste and grated yam give it a spongy, bouncy texture. This style is baked in the oven.
Easy Tamagoyaki Recipes for Beginners
If you’re a beginner cook or prefer a simplified method, here are two easier recipes:
- Quick & Easy Tamagoyaki — For one serving, perfect for a lunch box.
- 3-Ingredient Simple Tamagoyaki — No dashi required, so it’s fast and easy to make.
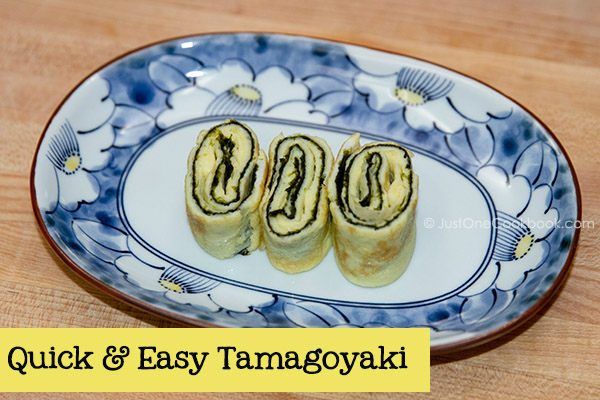
If you have never tried making tamagoyaki recipe before, skip this post and practice rolling the omelette with my 3-Ingredient Simple Tamagoyaki first.
Ingredients You’ll Need for Dashimaki Tamago
You just need simple Japanese pantry ingredients for this recipe. To find the right balance of sweet and umami flavors, feel free to adjust the seasonings to suit your taste:
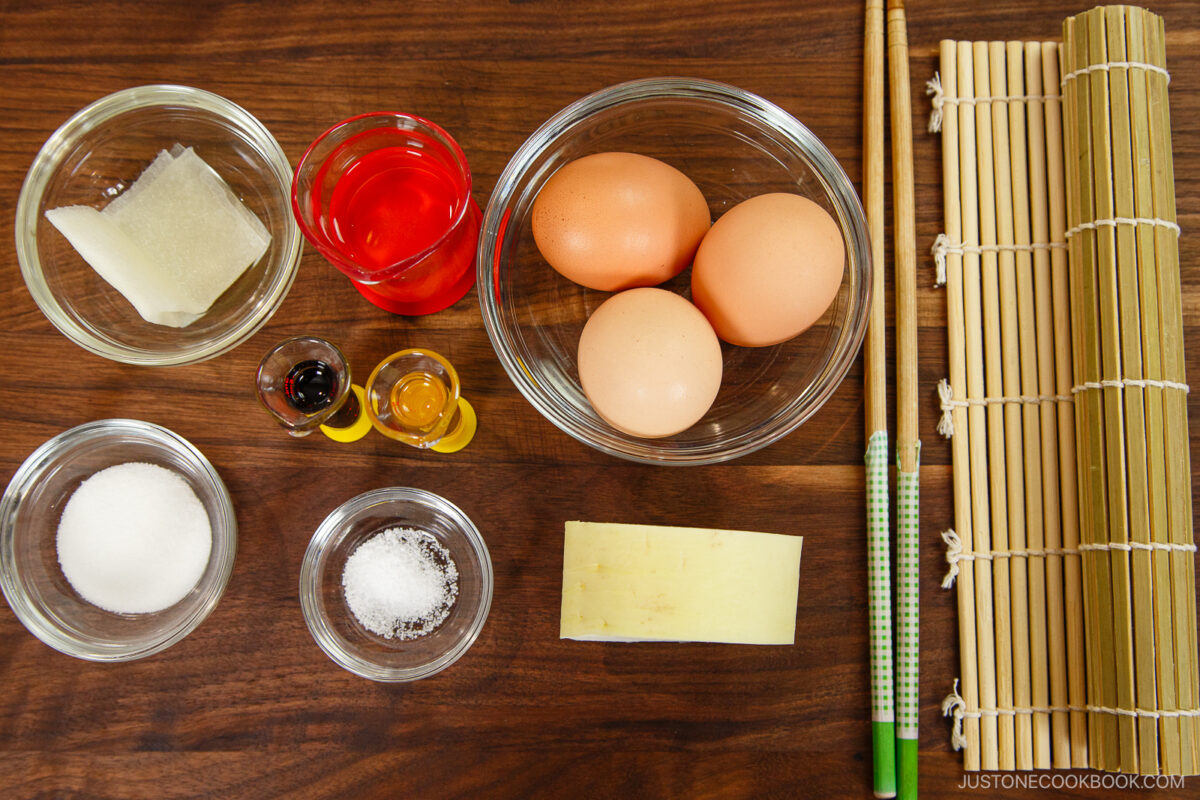
- large eggs
- dashi (Japanese soup stock) – see the next section
- seasonings – soy sauce, mirin, sugar, and salt (adjust to reduce the sodium)
- for the garnish – daikon radish and soy sauce
3 Ways To Prepare Dashi (Japanese Soup Stock)
Because the dashimaki tamago uses more stock, preparing tasty dashi creates a more delicious final dish. I recommend one of these three methods:
- Kombu and katsuo dashi made from scratch (takes 20 minutes)
- Vegan/vegetarian dashi made from scratch (takes 20 minutes)
- Dashi made with a dashi packet (takes 3 minutes)
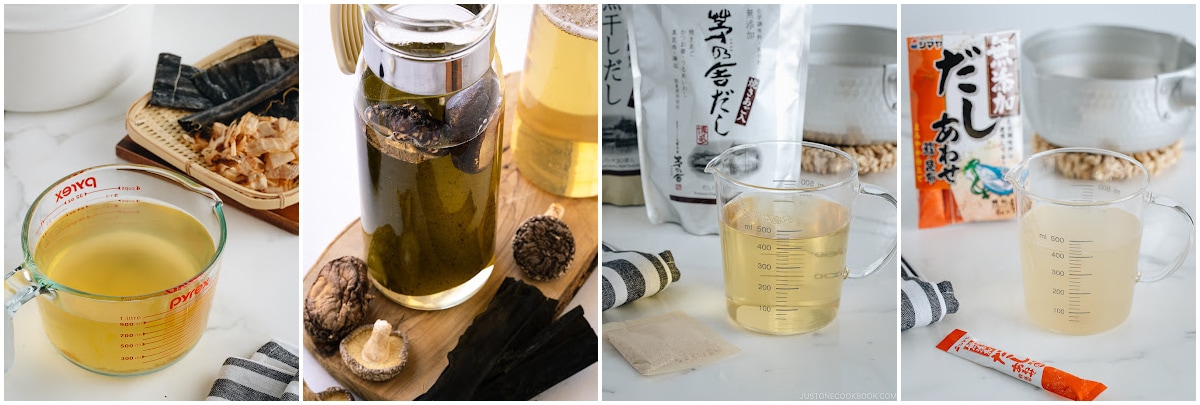
I always use the dashi packet method for convenience and good flavor. You can easily get it on Amazon or from a Japanese grocery store.
Dashi made with dashi powder may cut the prep time and total time since it only takes 1 minute, but I don’t recommend it as the flavor is not robust.
How To Make the Best Dashimaki Tamago
Here’s a quick overview of the steps. Read the recipe card below for detailed tips, techniques, and photos.
- Heat the pan thoroughly. I start heating it on a very low heat while I prepare the egg mixture.
- Prepare the egg mixture. Whisk and combine the eggs, dashi, and seasonings.
- Grease the pan thoroughly. Apply the oil with a pastry brush or paper towel. Check if the pan is hot enough by touching it with chopsticks dipped in egg mixture. If it sizzles, the pan is ready for the first layer.
- Pour a thin layer of egg mixture into the pan and pop the air bubbles.
- Once the egg mixture is set on the bottom but runny on the top, roll from the far side of the pan toward the end closer to you.
- Repeat steps 3 through 5 until you use all the egg mixture.
- Shape the tamagoyaki using the bamboo sushi mat (optional) and cut into equal pieces.
Serve it as part of a Japanese breakfast along with a bowl of hot rice, miso soup, grilled salmon fillet, and Japanese pickles.
5 Cooking Tips for the Best Tamagoyaki
Tamagoyaki requires some practice to get right, but you will get better each time you make it. Here are a few helpful tips:
- Use a 1:3 ratio of dashi to eggs. As a rule of thumb, 1 tablespoon of dashi per large egg is a good ratio. If you want to try restaurant-style dashimaki tamago, you can increase the dashi. Before you try this, make sure you’re comfortable making tamagoyaki because it’s extremely difficult to fold and roll.
- Do not worry about neatness in the first few layers. The inner rolls do not need to be perfect, as you will keep rolling more layers on top. The first few rolls are the center of the tamagoyaki, so they don’t need to lined up neatly!
- Always grease the pan. I know you want to use less oil to reduce calories. So do I! However, you must coat the pan with oil so the egg doesn’t stick to the pan. This goes for a nonstick pan, too.
- Heat the pan completely before starting. Test the temperature with a small amount of egg mixture. The egg must sizzle to confirm that the pan is hot enough.
- Control the heat by moving the pan away from the heat source. Keep your heat at medium at all times. We need to roll up the thin layers of omelette quickly before it overcooks, so there is no time to adjust the heat. The best way is to move the pan closer to and away from the stove.
Tamagoyaki Pan for a Classic Shape
Rolled omelette is a staple in Japanese home cooking that we make for breakfast and the bento box, so it’s worth investing in a special pan. Tamagoyaki pans are either square or rectangular, so you can easily make the Japanese rolled omelet into a log shape.
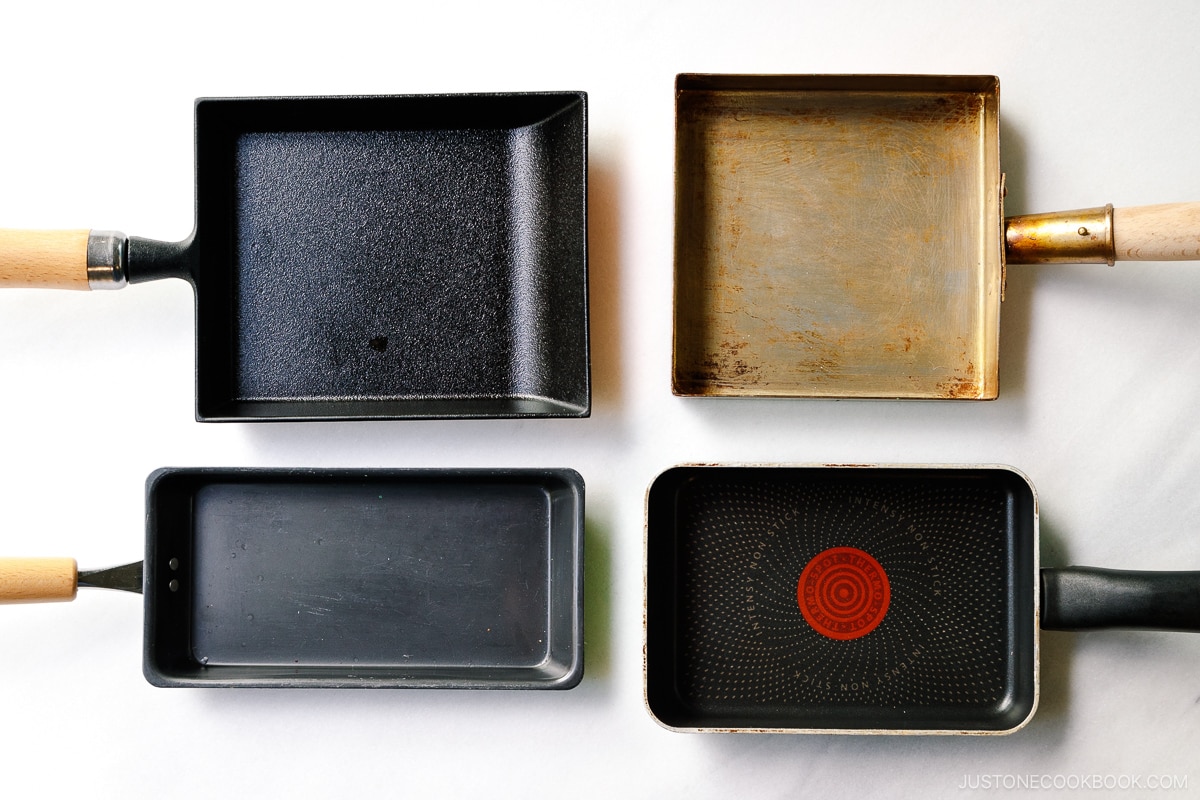
Here are the various types of tamagoyaki pans I’ve tried in the past:
- nonstick tamagoyaki pan
- copper tamagoyaki pan
- carbon steel tamagoyaki pan
- cast iron tamagoyaki pan (my favorite since 2024)
FAQs
Is tamagoyaki sweet or savory?
Tamagoyaki is sweet and/or savory, depending on the recipe and region. Most home-style versions balance both flavors using sugar along with soy sauce, mirin, and dashi. This recipe leans lightly sweet and savory, with dashi adding umami rather than strong sweetness.
Do I need a tamagoyaki pan to make tamagoyaki?
No, you don’t need a special pan to make tamagoyaki. A rectangular pan helps create a neat, traditional shape, but a regular round frying pan works well and tastes just as good. Many home cooks start with a round pan and still get great results.
What is the difference between tamagoyaki and a regular omelette?
Unlike a Western omelette, tamagoyaki is made by rolling thin layers of seasoned egg into a log. It’s lightly sweet and savory, often flavored with dashi, and has a soft, custardy texture. Western omelettes are usually folded once and tend to be more savory and hearty.
Can I use a round frying pan for tamagoyaki?
Yes! You don’t need a special tamagoyaki pan, and a round frying pan will work. I demonstrate both methods in my video and the step-by-step recipe images below. For a thicker tamagoyaki, use a 9- or 10-inch nonstick frying pan.
More Tamago (Egg) Recipes
- Omurice (Japanese Omelette Rice)
- Ajitsuke Tamago (Ramen Egg)
- Onsen Tamago (Japanese Hot Spring Eggs)
- Hanjuku Tamago (Perfect Soft-Boiled Eggs)
- Tamago Sando (Japanese Egg Sandwich)
Wish to learn more about Japanese cooking? Sign up for our free newsletter to receive cooking tips & recipe updates! And stay in touch with me on Facebook, Pinterest, YouTube, and Instagram.

Tamagoyaki (Japanese Rolled Omelette) — Dashimaki Tamago
Ingredients
- 3 large eggs (50 g w/o shell)
- 3 Tbsp dashi (Japanese soup stock) (use standard Awase Dashi or Vegan Dashi; or make quick dashi with water and a dashi packet or dashi powder)
- 2 tsp sugar
- 1 tsp soy sauce (use GF soy sauce for gluten-free)
- 1 tsp mirin
- 2 pinches Diamond Crystal kosher salt
- 2 Tbsp neutral oil (for cooking)
Instructions
Before You Start
- Tamagoyaki with dashi is the most challenging to roll as the egg mixture is watery. If you're a beginner, practice first with my 3-Ingredient Simple Tamagoyaki recipe.Gather all the ingredients.
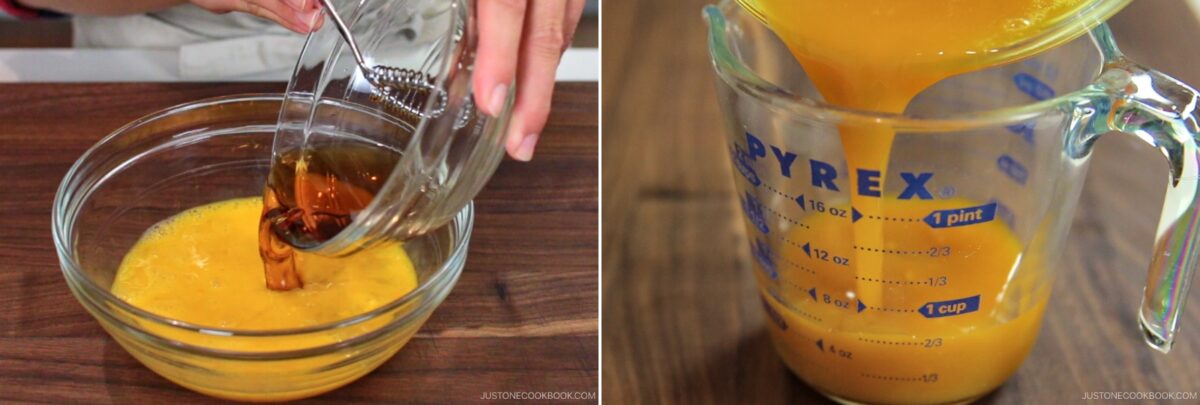
- Crack 3 large eggs (50 g w/o shell) into a bowl. Whisk by "cutting" through the eggs with chopsticks in a zig-zag motion, taking care not to overmix.

- Combine the seasonings in another bowl: 3 Tbsp dashi (Japanese soup stock), 2 tsp sugar, 1 tsp soy sauce, 1 tsp mirin, and 2 pinches Diamond Crystal kosher salt. Mix well.
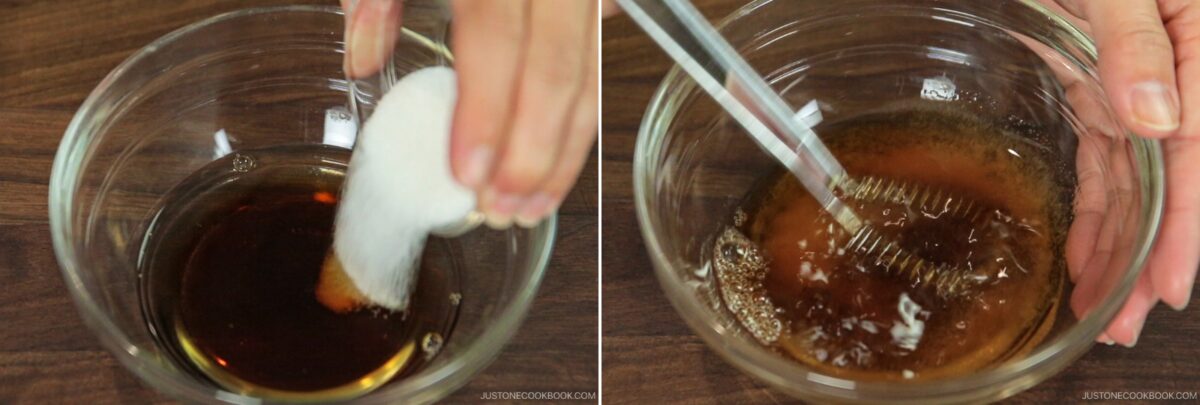
- Add the seasonings to the eggs and whisk to combine. Don't overmix. Transfer the mixture to a measuring cup with a spout.
To Cook
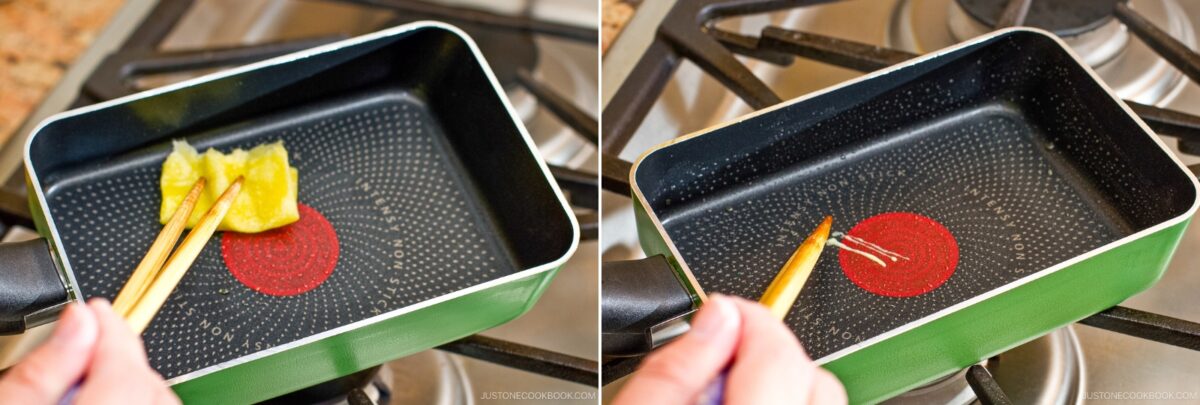
- Heat the pan over medium heat. Dip a folded paper towel in 2 Tbsp neutral oil and apply a thin layer to the pan. Add a drop of egg mixture — if it sizzles, the pan is ready.
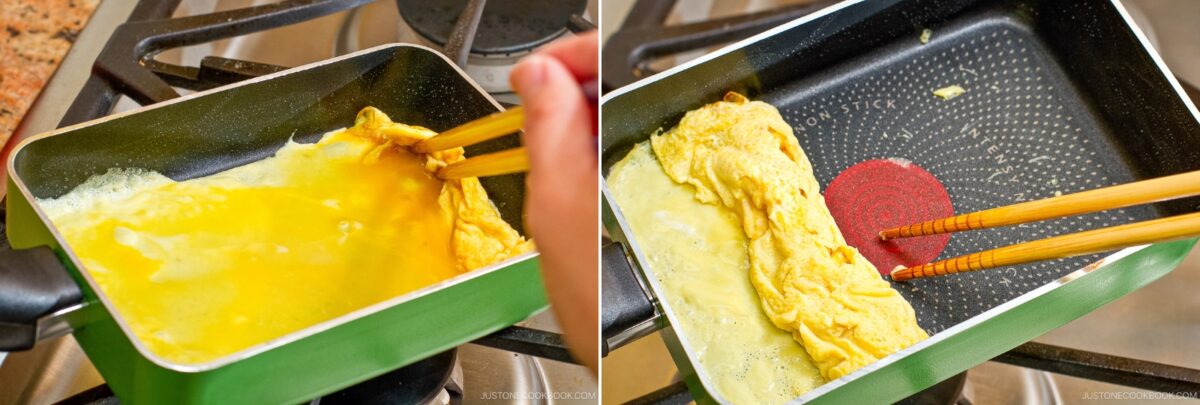
- Pour a thin layer of egg into the pan and quickly tilt it so the mixture coats the entire cooking surface. Poke any air bubbles with cooking chopsticks.
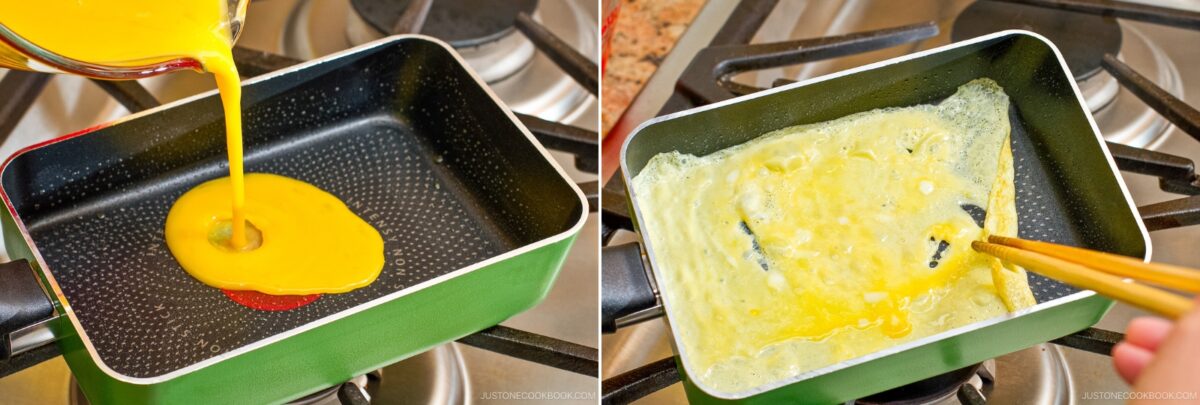
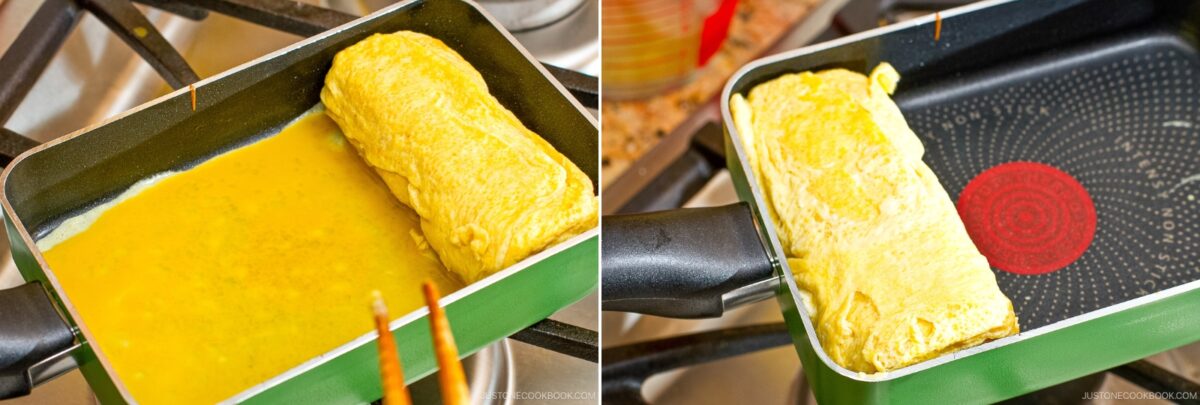
- When the bottom is set but the top is still runny, roll the egg into a log shape using chopsticks or a spatula, starting from the far side of the pan toward the handle. Move the rolled omelette to the far side. Apply more oil to the pan with a paper towel, even under the omelette.Nami's Tip: Don't worry about rolling perfectly at this stage, since the inner layers will be hidden inside.
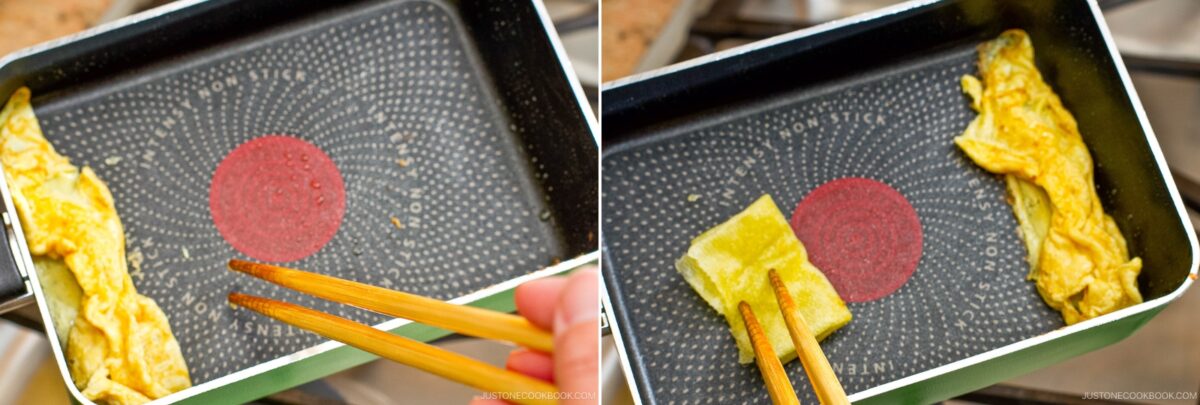
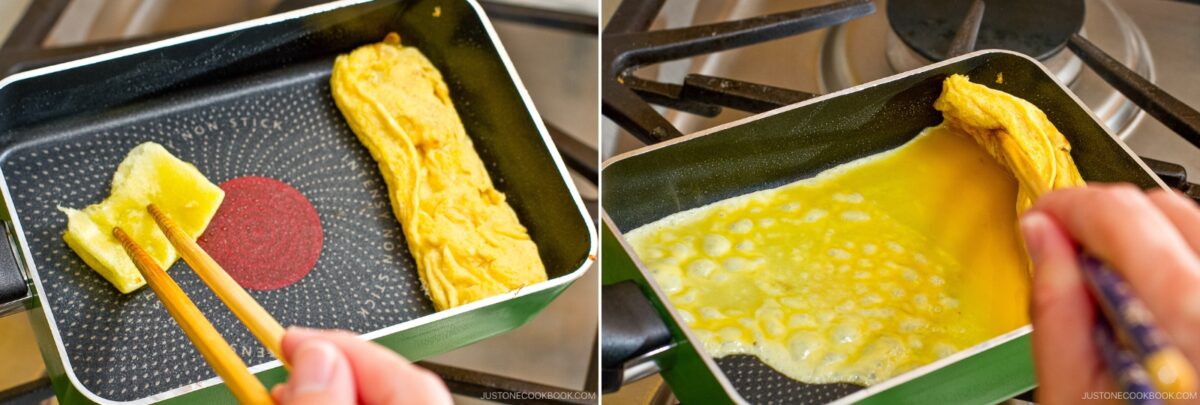
- Pour the second thin layer of egg, just enough to cover the bottom of the pan. Lift the rolled omelette and tilt the pan to spread the egg mixture underneath. When the new layer of egg has set and is still soft on top, roll it as before from the far side toward the handle.Nami's Tip: Control the cooking temperature by lifting the frying pan rather than adjusting the stove heat. If the heat is too weak, the egg will stick to the frying pan, so be careful.
- Move the rolled omelette to the far side. Reapply oil on the pan and under the omelette. Pour the next thin layer of egg and tilt to coat the entire surface—including under the omelette.
- Roll again when the bottom is set and the top is still soft.
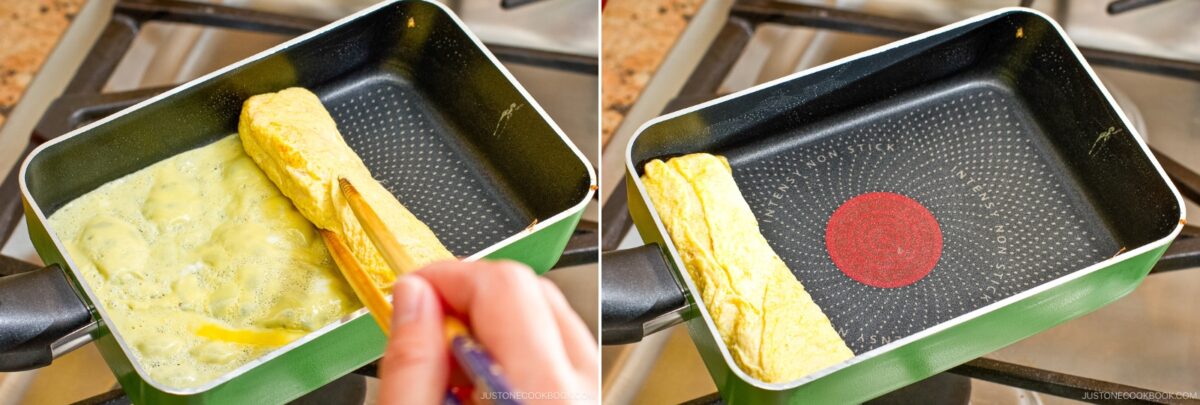
- Repeat until all the egg mixture is used.
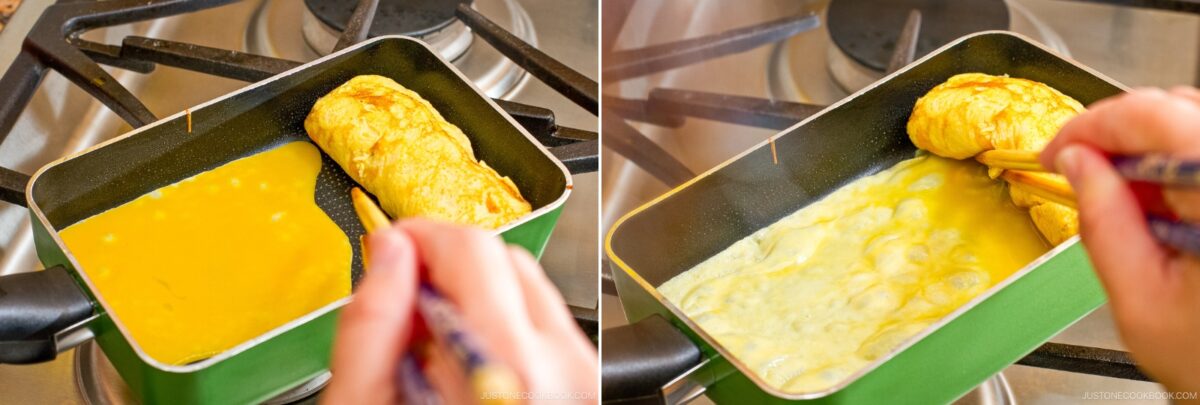
- On the final round, brown the omelette lightly on each side, if desired.
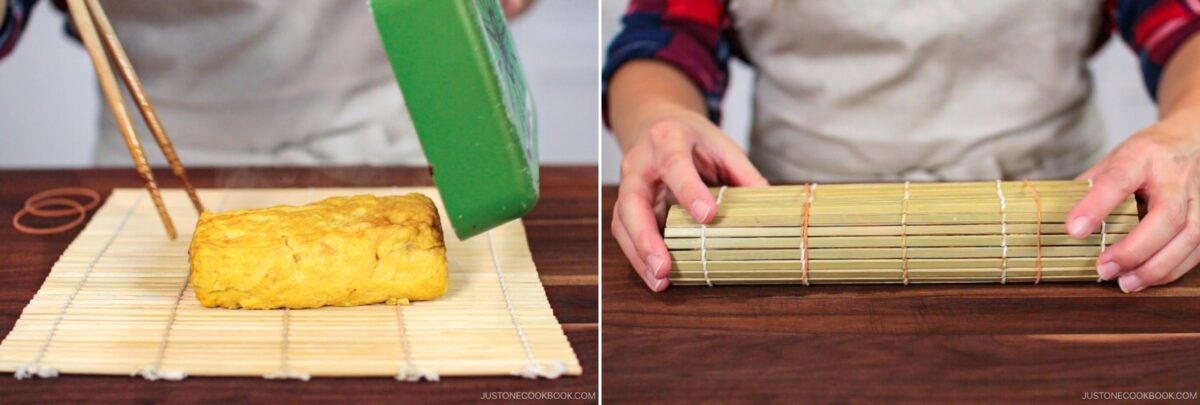
- Remove the omelette from the pan. While still hot, place it on a bamboo sushi mat and roll tightly to set the shape. Let stand for 5 minutes.Nami's Tip: Rolling in the bamboo mat is optional but recommended for a neat log shape.
To Serve
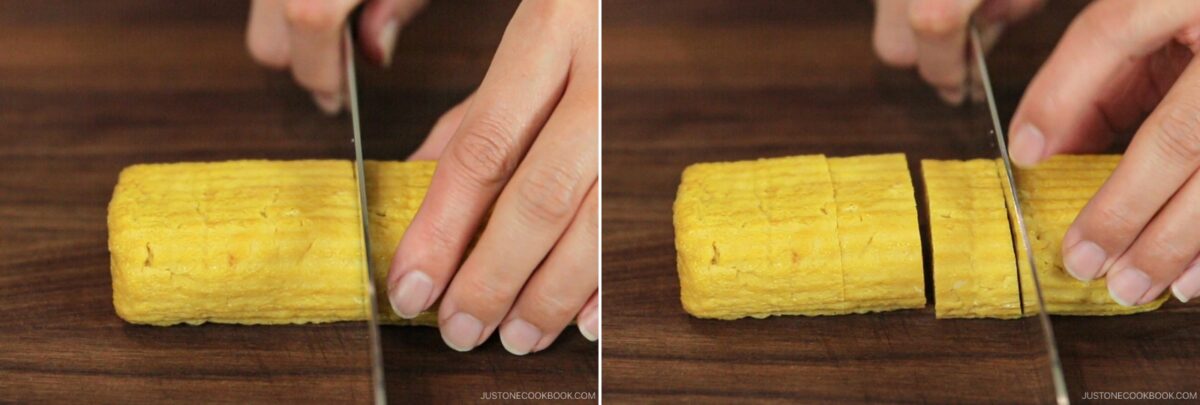
- Slice the omelette crosswise into ½-inch (1-cm) pieces. Optionally, serve with a mound of grated daikon and a splash of soy sauce on the side.Nami's Tip: Gently squeeze out any excess water from grated daikon.
To Store
- Cool and transfer to an airtight container. Refrigerate for up to 1–2 days or freeze for up to 2 weeks. Thaw overnight in the refrigerator, or reheat directly from frozen in the microwave.
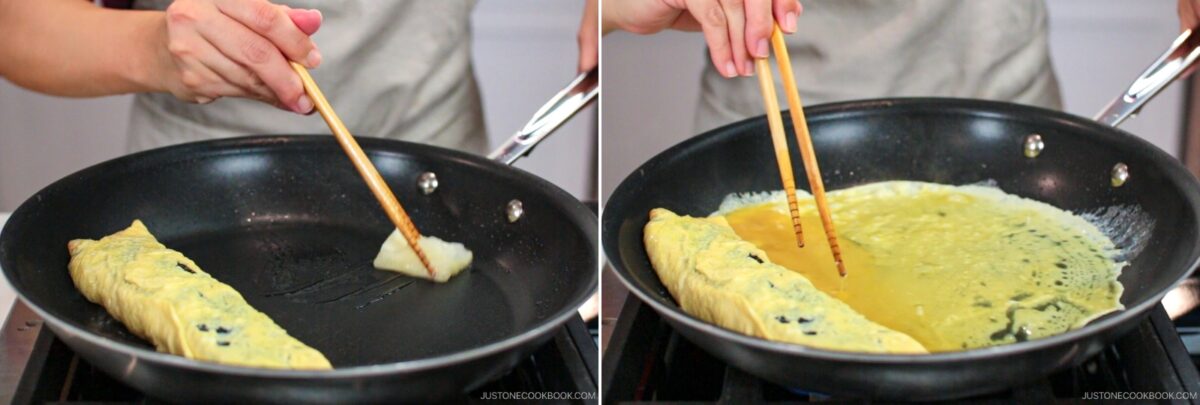
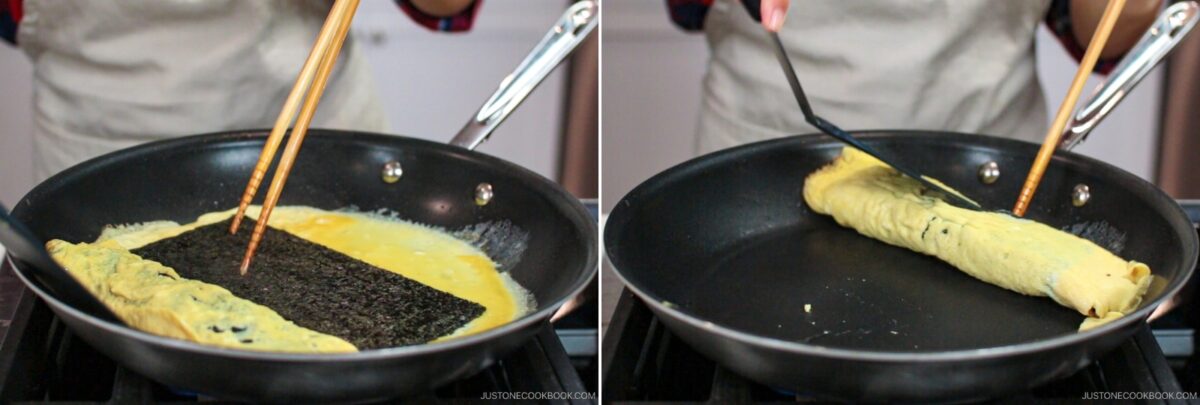
To Cook in a Round Frying Pan
- If you don't have a rectangular tamagoyaki pan, a round frying pan works too. As you roll, tuck in both rounded edges of the egg layer before each roll to keep the shape straight—or trim the edges with a knife once finished. The roll will be shorter, but just as delicious.
- If you'd like to add a filling such as a nori sheet, place it on top of the egg layer when the bottom is set and the top is still slightly runny, then roll as usual.
Notes
- Plain and simple. Skip the dashi for a firmer, easier omelette. Try my 3-Ingredient Simple Tamagoyaki.
- Sweeter style. Add more sugar to make atsuyaki tamago—a thicker, sweeter version. See my Japanese Sweet Rolled Omelet recipe.
- Add nori. Tuck sheets of nori seaweed between layers before rolling for extra flavor. I show this in method 2 in the recipe card below.
- Make it restaurant style. Add more dashi than I do to make oven-baked castella tamago. It’s similar to my Datemaki recipe.
Nutrition
Did you make this recipe?
Tag @justonecookbook on Instagram so we can see your delicious creation!
Editor’s Note: This post was originally published in March 2012. The video and new photos were added in January 2016. The post content was updated in August 2019.